


-


Popular Posts
Tag Archives: kids book craft
most marshmallows + marshmallow craft!
 Most Marshmallows by Rowboat Watkins (2019).
This picture book exudes creativity, both in the story and the illustrations that help tell it—photos of marshmallow-people in various scenarios!
It’s the simple story of “most marshmallows.” The ones who watch TV and celebrate birthdays and go to school and all that stuff most people do too. But it’s also a story of those marshmallows who aren’t like most. Because some marshmallows secretly know that all marshmallows can dream big. And this book tells them to do just that.
 (click image(s) to enlarge)
The art is where you really spend your time with this one. The adorable marshmallows. And the vignettes, mostly cut paper, but all sorts of other items that are fun to identify and wonder at.

 Most Marshmallows is creative, quirky, unusual, and encouraging. It demonstrates with both text and visuals that most things are done a certain way—books even!—but that some marshmallows dream up ways to do things differently. Daringly. Imaginatively.
 And you, little marshmallow reader, you can too.
Big thanks to Chronicle Books for the review copy and images!
+
Rowboat Watkins’s books often shout craft (as in the one I made for Rude Cakes). In this case, marshmallows? Yes, please.
Rowboat was kind enough to share some tips about how he created those marshmallows. Mainly: let the marshmallows get stale first! That way, they harden and become an easier surface to draw on. He also let us in on the pen he used: a brown Micron 01. I opted for a thin, brown marker instead as I found it a little easier to maneuver and plus, my marshmallows were only 0ne-week stale. Little hands might find a marker easier as well.

What you’ll need:
Stale marshmallows (I used jumbo)
A marker or pen (I used these from IKEA in brown, but I’m sure there are many that would work)
That’s it! But you can also use construction paper, tape, and markers to whip up party hats if you would like.
 I left my marshmallows out on a plate for about a week. Then, I was ready. I simply drew on each one, trying to get them at least somewhat like the book version. Then, I cut some circles from construction paper and rolled and taped them into party hats.


 You may also like this Beekle marshmallow craft!

wallpaper by thao lam + paper creature craft!
The first thing you’ll notice about this picture book is that wallpaper from the title. Beautiful, Layered. Nostalgic. Full of wonder. It’s at the heart of this mostly wordless story and contains a whole world that imagination makes possible. A world in which a shy girl gains just the courage she needs through her own creativity and resourcefulness.
We’re introduced to a character who’s just moved to a new house and is unpacking her room. Outside her window, there’s a treehouse with other kids in it. They wave. They’re friendly. But waving back is not so easy when you feel out of place or out of sorts. Shy or scared or sad.
 (click image(s) to enlarge)
Crouching—hidden—below the window, the character peels back some wallpaper, releasing a flock of lemon-yellow birds! (And they just so happen to match her shirt.)

She peels back more wallpaper and follows the birds into a whole world of wallpaper, including a creature who is super scary, but who, it turns out, is actually not scary all. The creature is merely unfamiliar. The creature wants to be friends.


The character and creature frolic in fields and play with clouds, all provided by this magical wallpaper. And when she’s back in her room, alone again, the wallpaper isn’t just one pattern anymore. It’s been peeled to reveal all the layers she’s experienced,.
Those layers help her remember that she doesn’t have to be so scared, or that she can be scared and still experience new things. They help her remember that unfamiliar might not be ominous after all. And that by peeling back a layer or two, everyone wants to be seen, welcomed and, accepted. Just like her.


And that leads to hello, and to more possibility.
This is an original, artful, hopeful picture book that invites the reader to dive into paper creations and possibility and what it means to reach out to someone unfamiliar and turn them into a friend.
Big thanks to Owlkids Books for images and a review copy!
+
Such beautiful papers and such a spirited creature can only mean one thing. Paper craft! I wanted to make that creature and I wanted to make sure the creature could move. Really, you could make all kinds of paper stuff from this book! I chose the creature and yellow birds and used brads so they could change position.


What you’ll need:
Sturdy white paper (I used watercolor paper)
Pencil
Eraser
Scissors
Brads
Pastels or crayons or markers (I used pastels for the creature, marker for the birds)

I started by tracing the creature on a thin sheet of computer paper. Then, with my watercolor paper behind that, I pressed firmly with pencil to leave an indentation I could then trace on the actual paper I wanted to use. Or you can draw the creature free hand! I did the body, arms, and legs as separate pieces, then cut them out. Be sure to leave the pencil lines and make some white space outside the pencil lines to mimic Thao Lam’s style.
 Next, I colored in the creature! And after that, I attached the limbs with metal brads. You can poke holes by either pressing the scissor ends into the paper or folding a bit and making a tiny cut. It’s that simple! Now you have a creature you can move about!
And it’s the same process for the birds if you choose to make those, and there are many shapes that would be fun to draw, cut out, and color from the book. The sky’s the limit!


And check out this gif of the creature moving around!

penguinaut + felt storytelling craft + giveaway!
 Penguinaut by Marcie Colleen and Emma Yarlett (2018).
What really stuck out to me about this picture book is the language. It’s fun. It’s snappy. It’s clever. And it tells the story of this penguin turned Penguinaut named Orville perfectly.
Sure, it’s about the big adventure he longs to have and his ensuing trip to the moon. But more than that, it’s about something even bigger: his friends.

(click image(s) to enlarge)
Orville has big friends. Orville wants to do something BIG. Orville wants to do it himself. (Notice “flippered out” on that spread. That’s a taste of the terrific, inventive language I’m talking about.)


Orville does have a big adventure. The biggest. But just when he’s overcome with loneliness in spite of it, a note from his friends falls out of his pocket. And that note brings him home, the place where stories of adventure are told: together. And as anyone who’s ever had an adventure and then had the pleasure of telling a friend about it, that’s a pretty big deal.
A cheerfully zippy story with a vibrantly sweet heart.
Big thanks to Marcie Colleen for images and Scholastic for a review copy!
+
Zoe of Northwest Felts and I met on Instagram a while back and so when I read this book and thought, “felt craft!” I also thought of her wonderful felt creations that are so perfect for not only crafting, but for storytelling too. She was kind enough to make a felt storytelling craft for Penguinaut, and is giving it away!
Take it away, Zoe!
When I first read Penguinaut, I was struck by the amazing outer space scenes. Danielle and I both agreed that they should be featured in whatever craft I created. Most of my crafting is done with felt as the medium, and it seemed like the right choice for the Penguinaut craft, too!
I wanted to make something that could be manipulated and played with after the actual craft was complete, almost like a felt story. I also wanted the craft to bring to life the “do it yourself” struggle all children and parents (and Penguinauts) inevitably go through.

What you’ll need:
Fabric glue (I normally sew my creations, but glue works too!)
Children’s scissors*
Felt sheets (orange, red, yellow, brown, black, white, beige, green, blue)
Black Sharpie
Safety pins
Photocopies**
*Children’s scissors are my secret weapon for cutting felt.
**I used photocopies from pages of the book in order to get the characters just right. If you’re skilled at drawing, you could easily draw the characters instead.

In order to make this a craft that older children can do by themselves, I would suggest getting photocopies of the main pieces from the story (the Penguinaut and the space ship are the two that I focused on, but get photocopies of whatever you want to create).
You can use the photocopies in two ways. The first is to trace the photocopy onto the felt and cut out the traced image. The second way is to safety pin the photocopy onto the felt and cut out around the photocopy. I used the second option because it creates cleaner lines.

To create a cleaner finish, you can glue penguinaut’s feet in between his white tummy piece and the rest of his body.

Now that we have a penguinaut, we can work on his space suit. I wanted him to fit inside the suit, so I made a suit that can open and close. I did this by first cutting long, thin strips on orange, to create hinges. Next, I glued them, half to the white backing of the suit, and half to the orange front of the suit. Finally, I folded the suit over so the hinges were hidden on the inside.
I also wanted Penguinaut to be able to get into and out of his spaceship, so I glued an extra piece of beige felt to the back. This created a little nook that penguinaut can sit in during his space adventure.


For the background, I chose to do the outer space scene. I loved the colour contrasts and the twinkling stars. Some of the pieces are glued down (Earth, the Moon, the clouds and stars) while other pieces are left unglued so that they can be moved and played with (the spacesuit, Penguinaut, and the flag).
Have fun with this part! I wanted to stay true to the illistrations in the book, but you can create different scenes based on your favourite part of the book (or your favourite part of space)!
I love the idea that you get to choose what to glue down and what to leave free to move around. Giving these choices can create a fun experience that can be revisited over and over again.

When the craft is done and you’ve finished exploring and playing with it, I love the idea of storing it on the wall as art. If you put it up on a felt board, a child can take it down and play with it whenever they want.
Thanks for following along!

Zoe is the maker at North West Felts. She loves using felt stories to create literacy experiences through play. Zoe’s favourite Felt set is Slippery Fish! She is a huge fan of children’s literacy and loves reading stories with her 2.5-year-old and her 8-month-old. Zoe is currently on maternity leave but will return to work as an Early Childhood Educator in the Spring. When she isn’t reading, she is using books as inspiration for her felt creations. Find her on Instagram and Facebook @northwestfelts.
+
Good news! We’re giving away a copy of Penguinaut and Zoe’s felt craft set to go with it!
Enter below (N. America only).
blue rider + pop-up paper craft by homemade city!
 Blue Rider by Geraldo Valério (2018).
This book is a stunner—wordless and captivating. The colors! The cut paper! The journey from the uniformity of the everyday to the magic of story and art and imagination. All because of a book!

(click image(s) to enlarge)
The story is simple. A child finds a book with a blue horse on it on a city sidewalk. Back in her apartment building, we see her reading in her room, the rest of the windows around her opaque and beige. But she’s reading this bright blue book with a bright blue horse on the front.


And then, we glimpse the vibrant, exuberant horse inside! It’s mid-jump and kind of carries the girl away, and into the book. Out of everyday life. Pages continue like that—we are in the book with the child, the horse artwork getting more and more colorful and more and more abstract. Now, the child’s room (and world and imagination) are filled with art and color and shapes and possibility.

Geraldo Valério was inspired by the German Expressionist Group Der Blaue Reiter (The Blue Rider) when making this book. It weaves in elements the group explored, like color and form having resonant meaning of their own. “The name ‘Der Blaue Reiter’ referred to Kandinsky and Marc’s belief that blue was the most spiritual color and that the rider symbolized the ability to move beyond.” (Quote found here.)
The child rider of the horse in the story certainly moves beyond—her surroundings, her modern, mundane world, her limits, by riding that horse out of the book and into her life. It moves her, it changes her, it shows her all kinds of possibility. Just the way reading and art can do.

This excerpt is taken from Blue Rider, text and illustrations copyright © 2018 by Geraldo Valério. Reproduced with permission from Groundwood Books, Toronto. www.groundwoodbooks.com
Big thanks to Groundwood Books for images!
+
I’m delighted to have Margaret from the wonderful literary kids’ craft blog, homemade city, here to share a truly exuberant Blue Rider craft with us! I’m a huge admirer of Margaret’s aesthetic and creations—her crafts are a must see (and make!).
Over to Margaret!
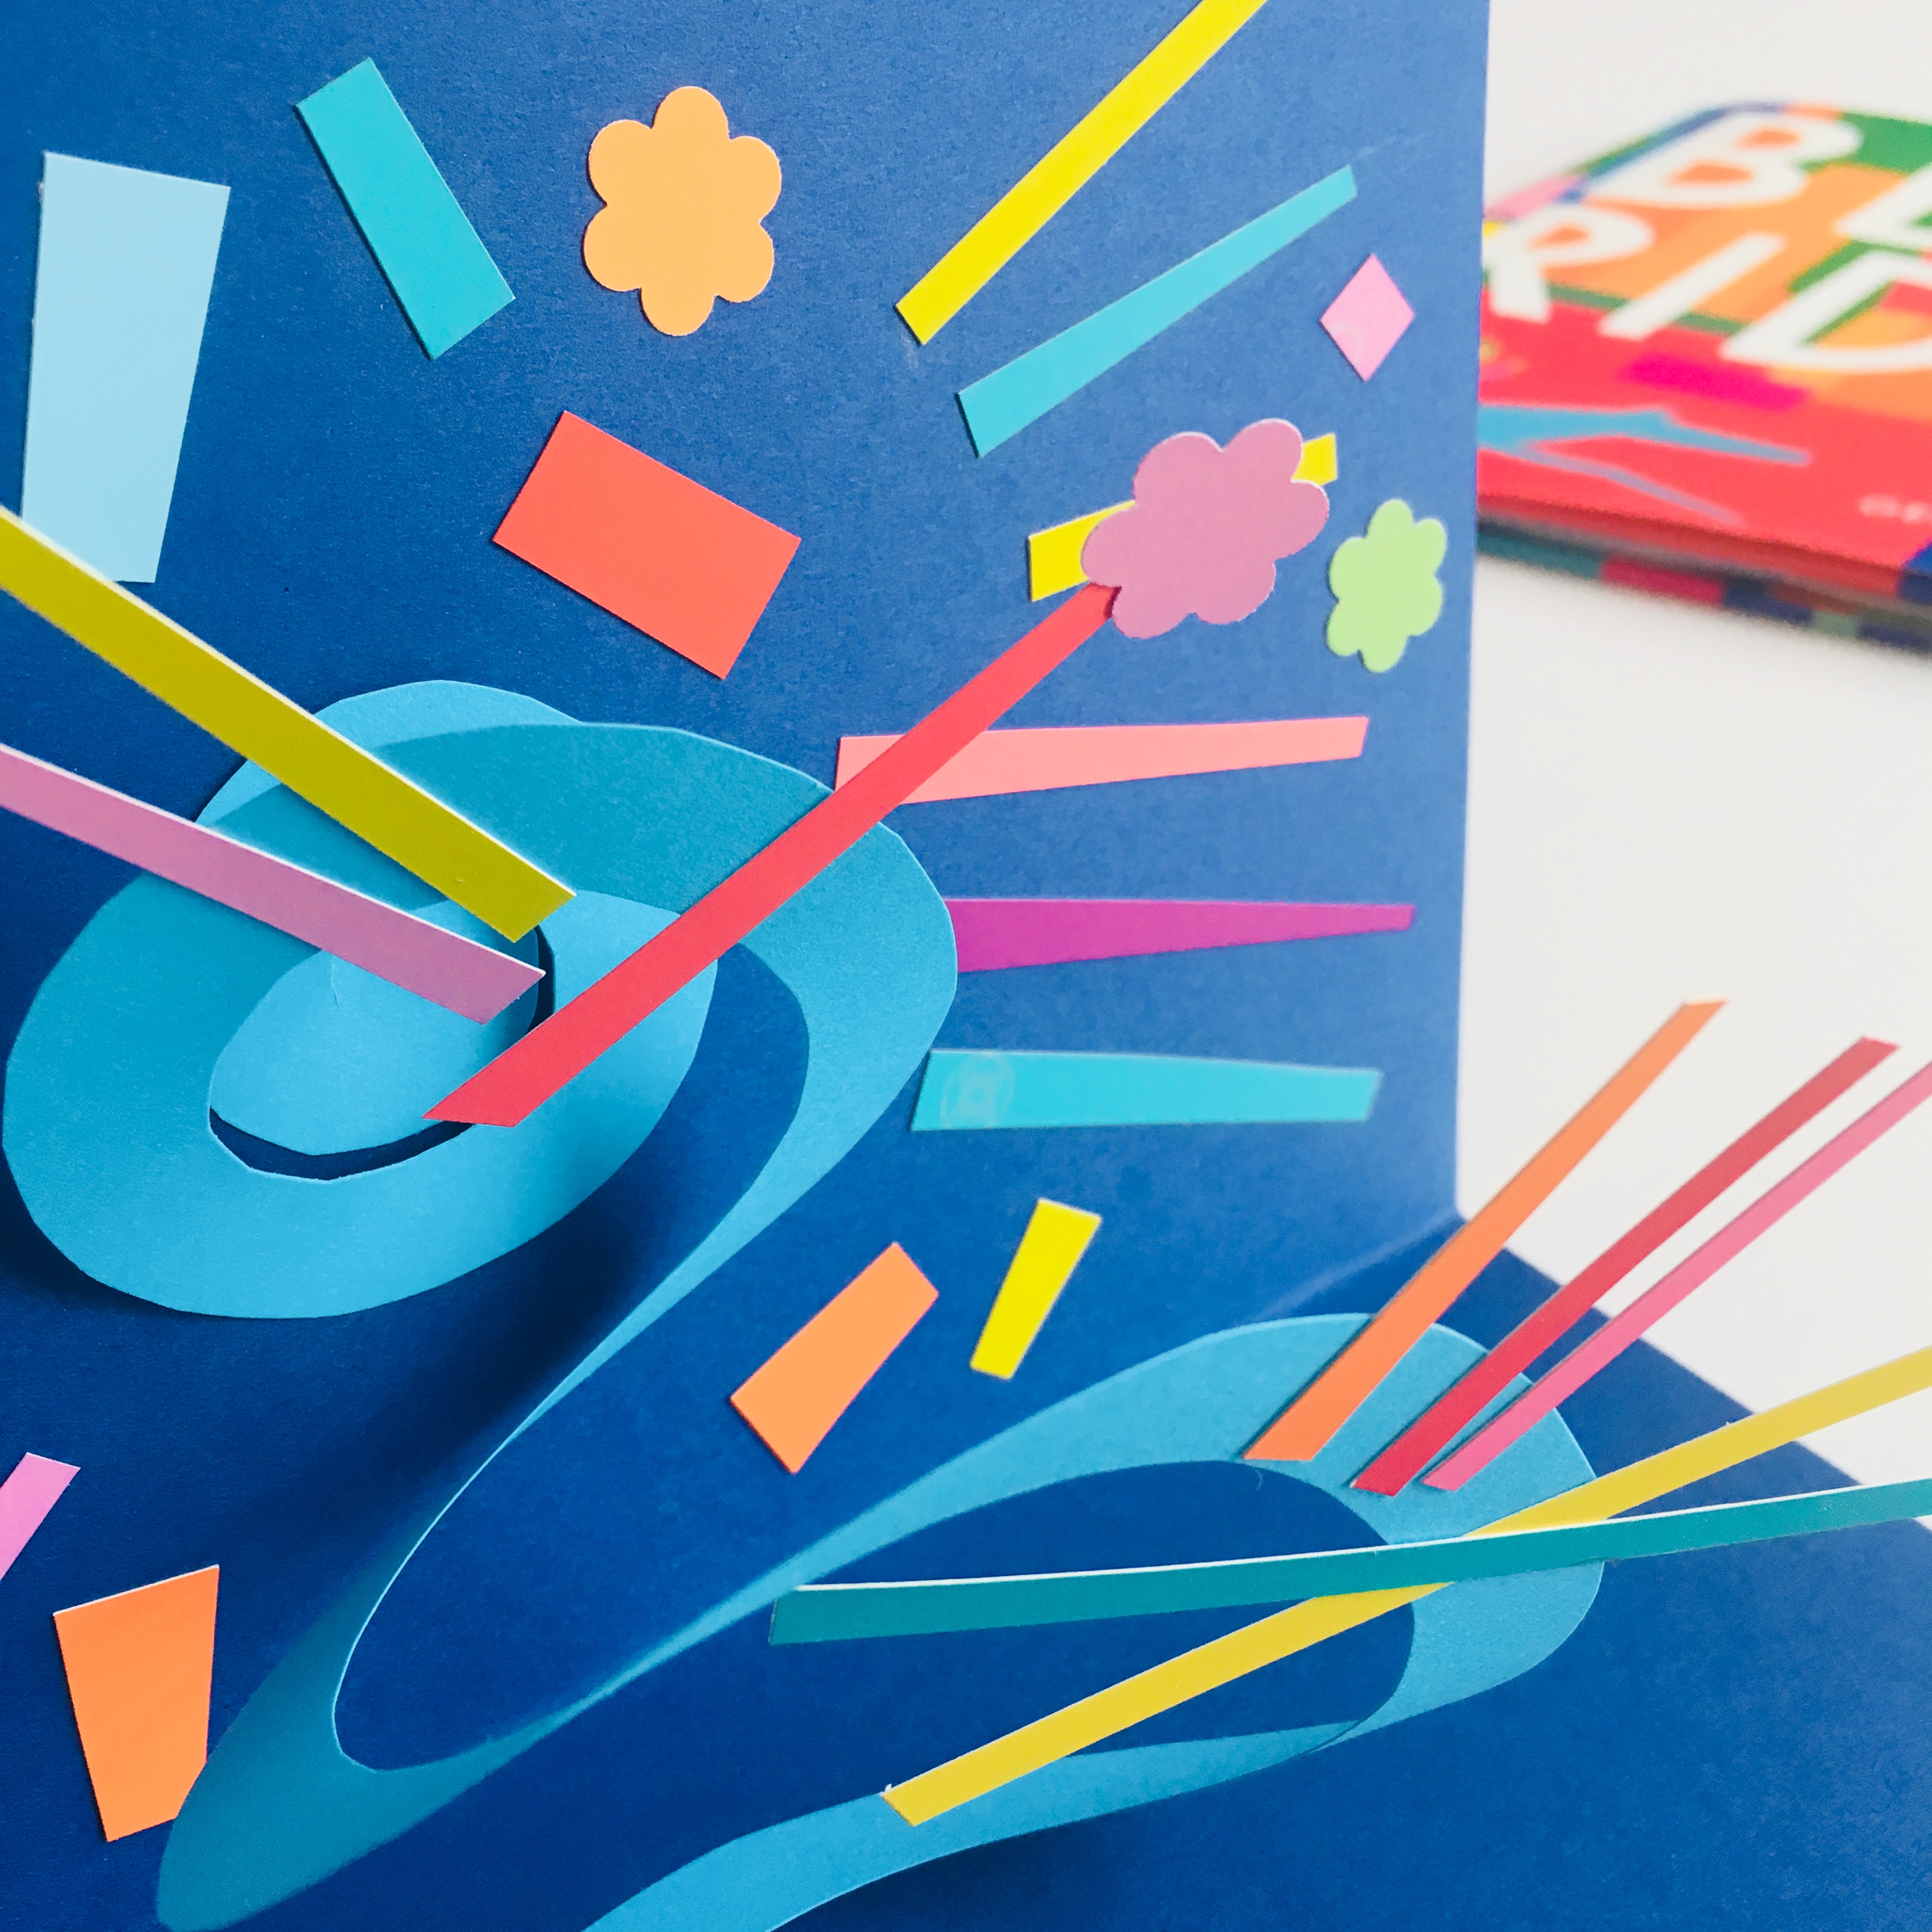
When you open the cover of Blue Rider by GeraldoValério, you’re met with delicious saturated color in an array of forms and shapes. It’s a treasure just like the book that the child character discovers on a city sidewalk in this wordless story. As the child opens the book, a blue horse leaps across the sky streaking the city’s gray grid with a spray of color.
When Danielle suggested I make a craft for Blue Rider, I happily took up my scissors and glue stick. But how best to reproduce the surprise and pleasure that a reader, like the child in Blue Rider, can find just by opening a book? How about a pop-up? With collaged bits of jewel-hued paper. And a blue horse, of course.

What you’ll need:
Card stock or construction paper
Paint color sample cards
Scissors
Glue stick

First, fold a piece of paper in half. I used an 8 1/2 x 11″ sheet of dark blue card stock. Set it aside.

On a different piece of paper, trace and cut out a circle on stiff paper. I traced a circle about 4″ in diameter using a tin coffee can. Cut a spiral into your paper circle. It’s OK to freehand, lopsided spirals are as beautiful as uniform ones. (Spirals are the simplest way to create a pop-up–and their shape adds whimsy and movement as you open the fold.)

Dab glue to the center of your spiral. Place your circle (side with glue facedown) inside of your folded paper.
Apply glue to an inch or two of the exposed tail of your spiral. Press the folded paper closed so that the glued tail will adhere to the other half of the paper. When you open the card, the spiral will pop up like a spring!

Now for the fun—cut shapes or hole-punch dots or stars or flowers from your paint sample color cards. If you want to write a message, trace letters and cut them out—whatever pleases you!


Glue your shapes to the spiral, making sure nothing peeks out when you fold the paper closed.

I cut out a blue horse and fashioned a rainbow mane like the one that canters across the city sky in Blue Rider. Then I added abstract shapes to the dark blue background, inspired by Valerio’s pages of rich color and collage. It was so delightful, I quickly made another with abstract bits and tiny hole-punched blooms. No horse this time, just color, shape, and surprise.

Thank you, Margaret! This craft is bursting with joy!
Margaret is the author of Mabel One and Only (Dial Books for Young Readers) as well as Flip: How the Frisbee Took Flight, a nonfiction picture book slated for Fall 2019 with Charlesbridge Publishing. By day, you can find her wearing cat glasses and cardigans as the children’s librarian at Hardy Elementary School in Arlington, Mass. In her free time, she makes wacky, colorful crafts at homemade city.
 You might also want to check out this NORMAL NORMAN paper craft Margaret from homemade city featured here a while back!
a hungry lion + lion cake craft
 A Hungry Lion or A Dwindling Assortment of Animals by Lucy Ruth Cummins (2016).
I don’t want to say too much about this book because it’s full of surprises. But I think it’s safe to say it’s mischievous, brave, and oh so much fun!
 (click image(s) to enlarge)
A Hungry Lion plays with our assumptions, with page turns, with wordless or nearly wordless spreads, and with a spunky narrator. And then it turns everything on its head. Possibly more than once.
 The beginning spreads set up a pattern. There’s an assortment of animals. And it’s dwindling. We can all imagine who the culprit is. Just look at his fangs! His angry orange mane!

Look how he hums, innocently, but how pig looks quite nervous nonetheless. But need she be? That is the question this book asks. One of them anyway.

Here’s a surprise I referred to! A cake and party surprise, one of the best kinds! Oh, but the story doesn’t end there. Not at all. There are more surprises in store, along with an answer to the question of who’s king of the animal kingdom after all. It might have less to do with fangs and an angry orange mane than was first assumed.
Big thanks to Simon & Schuster for images!
+
Those dwindling animals as cake toppers immediately came to mind for this picture book craft. There’s even a cake in the book itself! So, cake it had to be. As such, I enlisted the help of my dude, Todd Davis, to whip up a lion cake with a ribbony mane. Because he’s the guy to ask for stuff like that. Come see what we made!
 That’s a hungry lion cake. And that’s a dwindling assortment of animal cake toppers.

What you need:
A cake! If you make it like we did, you can go homemade or boxed in terms of cake and frosting. For eating, buttercream is best (and mentioned in the book). We used three cake layers for the base/mane, and one layer for the face.
Three 9 ” cake pans
One or two 6 ” cake pans
Cake ingredients
White frosting
Bowls
A spatula or butter knife
Pastry bags
Decorating tips (104, one small round one, and a large round one—or whatever you choose)
Food coloring (red, yellow, and black)
Skewers or slender candles (we used these candles in white)
White paper
Colored pencils or markers
Tape
Plate or cake platter
 We made our animal cake toppers first. We eyeballed the animals in the book to draw them, colored them in, and cut them out imprecisely. We taped one or two to each slender cake candle, and done! This is a great thing to do while your cakes bake. And when you’re ready, mix your food coloring with frosting (it takes a lot of red to make that deeper orange) in three separate bowls (two oranges and one black for face details).
 Frost between layers and stack them, then frost the entire surface area. Next, decorate, face first! Frost with orange and add features. Play! Our nose is made from part of that extra small cake we made and set on the face. But you can do it however you like. For the mane, Todd used a 104 petal decorating tip and went around and around with it making a thick squiggly line.
Voila!


You won’t be hungry after eating this cake! And you will be satisfied after reading this book, making this craft, or both.
Huge thanks again to Todd Davis of Davis Handmade (my husband)!


